
Rooftop Landscaping Ideas and Trends for 2025
As cities become more crowded and vertical living continues to rise, urban dwellers are looking upward for new green space opportunities. Rooftop landscaping, once a niche concept, is rapidly transforming into a mainstream lifestyle feature. In 2025, the trend is not just about adding plants to the top of buildings—it’s about creating sustainable, multifunctional retreats that seamlessly blend nature with modern urban living.
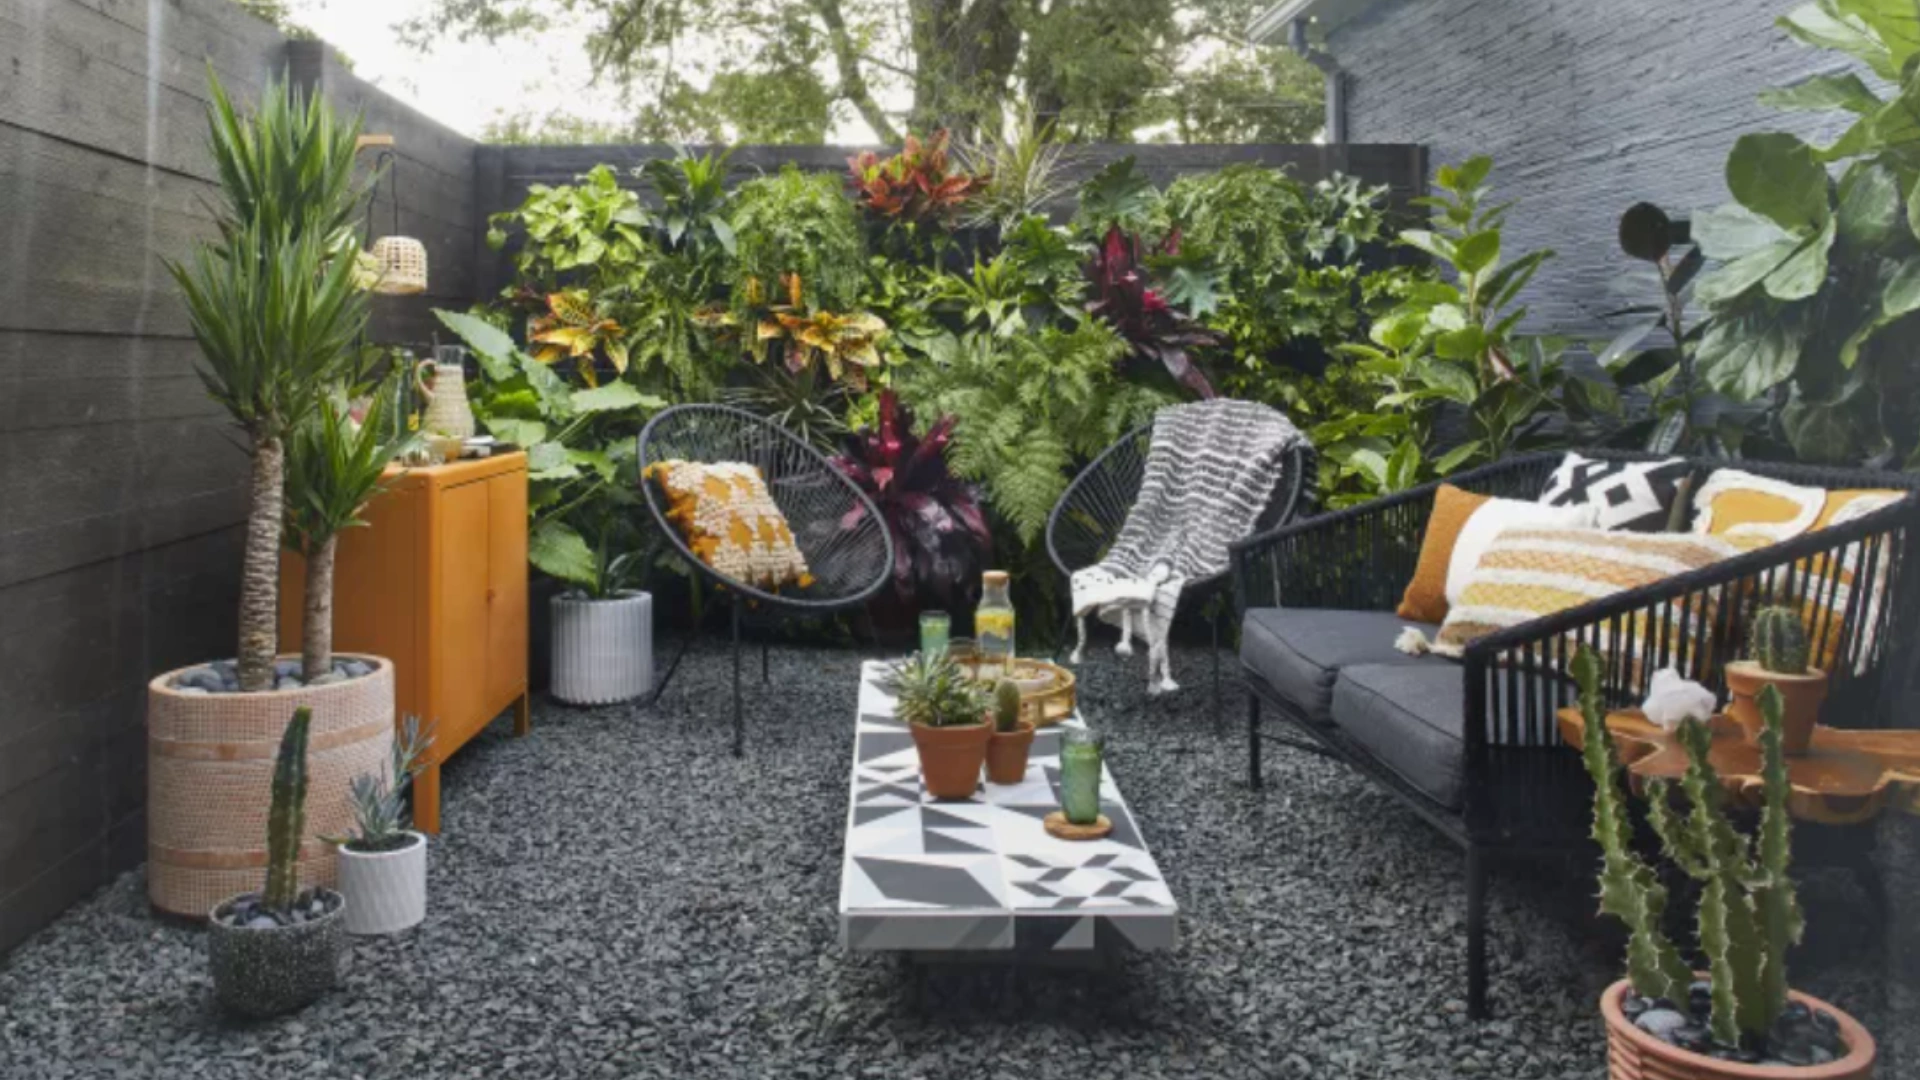
One of the most exciting directions in rooftop landscaping this year is the rise of multi-use garden terraces. These spaces are no longer limited to ornamental flower beds or occasional seating. Instead, rooftops are being transformed into extensions of indoor living—featuring outdoor kitchens, dining areas, lounges, and even small office zones. The goal is to create an environment that serves both relaxation and productivity, all while surrounded by greenery.

Sustainability is at the heart of rooftop landscaping in 2025. Designers are focusing on eco-conscious choices, such as native plant selections that require less water and maintenance, and incorporating recycled or reclaimed materials into the structures and furnishings. Water conservation is a top priority, with integrated rainwater harvesting systems and drip irrigation becoming standard in many rooftop installations. Additionally, solar-powered lighting and vertical wind turbines are being added to reduce environmental impact while enhancing usability.
Edible gardens continue to grow in popularity, particularly in urban settings where space for traditional gardening is limited. Rooftop landscapes are increasingly being used to grow herbs, vegetables, and fruit-bearing plants, turning what would otherwise be a simple green space into a productive garden. These edible installations not only provide fresh produce but also promote sustainability and local food sourcing—trends that are increasingly important to environmentally conscious homeowners.
Another defining trend is the use of modular and movable elements. As rooftop spaces need to be adaptable for different weather conditions and uses, furniture, planters, and shade systems are being designed with flexibility in mind. Foldable tables, retractable awnings, and stackable seating make it easy to shift the layout based on the time of day or event. This modular approach ensures that the rooftop remains functional year-round, regardless of climate or occasion.
Technology is also making its mark in rooftop landscaping. Smart irrigation systems, automated lighting schedules, and app-controlled climate monitoring tools are being integrated into rooftop gardens to make maintenance more manageable and efficient. These systems allow users to monitor soil moisture, sunlight exposure, and temperature remotely, ensuring optimal plant health without constant hands-on care.
Aesthetic trends are leaning toward natural minimalism. Instead of overly ornate garden designs, many rooftop landscapes are embracing clean lines, neutral tones, and an emphasis on texture over color. Natural wood, stone, and matte metal finishes dominate the palette, creating a calm and elegant ambiance. At the same time, designers are adding pops of personality through sculptural planters, artistic lighting fixtures, and water features that serve as visual focal points.
Privacy is another important consideration in 2025 rooftop design. With city life often being densely packed, people want to enjoy their rooftops without feeling exposed. Creative screening solutions—such as living walls, pergolas draped in vines, and slatted wooden dividers—help block unwanted views while adding style and intimacy. These elements contribute to a more secluded and peaceful environment where people can unwind or entertain without interruption.
As climate change and mental health awareness continue to influence how people shape their environments, rooftop landscaping is increasingly viewed not just as a design luxury, but as a necessity for healthier urban living. Green rooftops help reduce the urban heat island effect, filter air pollutants, and even contribute to noise reduction. At the same time, they offer a natural refuge from the concrete-heavy surroundings of modern cities—a space where residents can reconnect with nature and recharge.
In 2025, rooftop landscaping is about more than just beauty. It’s about functionality, sustainability, and a deeper sense of well-being. As more people recognize the value of turning their rooftops into vibrant, life-enhancing sanctuaries, we can expect cities to become greener—one building at a time.
Choosing the Right Landscape Trees for Your Garden
By James – Professional Landscaper
When it comes to garden design, few elements are as transformative and enduring as trees. The right landscape trees can define your garden’s character, create shade, attract wildlife, and even add value to your property. But with the abundance of species and cultivars available, selecting the ideal trees for your space can feel overwhelming. As a professional who has worked on gardens of all sizes and styles, I’d like to share my top tips for choosing landscape trees that will thrive and enhance your outdoor environment for decades to come.

1. Understand Your Garden’s Conditions
Before you get swept up by the beauty of flowering cherries or stately maples, it’s essential to understand your garden’s unique growing conditions. Key factors to consider include:
- Climate: Is your region prone to frosts, extreme heat, or heavy rainfall?
- Soil type: Sandy, clay, loamy—each affects tree selection and growth.
- Sunlight: Observe how much direct sunlight each area receives throughout the day.
- Space: Consider the mature height and spread of your chosen trees. Planting too close to buildings or fences can cause issues down the line.
A little observation and research go a long way toward preventing problems and ensuring healthy, happy trees.
2. Define Your Landscape Goals
Ask yourself: what do you want your trees to achieve? Here are some common objectives:
- Shade: Large deciduous trees like elms, oaks, or jacarandas are perfect for creating cool retreats.
- Privacy: Evergreens such as magnolias, lilly pilly, or conifers act as natural screens.
- Colour and Interest: Consider flowering trees (like crepe myrtle or flowering plum) or those with striking foliage (such as Japanese maple).
- Wildlife Habitat: Native trees like eucalyptus and bottlebrush attract birds, bees, and butterflies, enriching your garden ecosystem.
Knowing your goals will help you narrow your choices and design a garden that fits your lifestyle.
3. Consider Maintenance and Longevity
Some trees require more upkeep than others. For example, deciduous trees drop their leaves each autumn, which may increase your garden maintenance. Fast-growing species provide quick results, but may be short-lived or prone to structural issues. Slow growers can take years to mature, but often reward your patience with greater strength and longevity.
Think about:
- Root systems: Avoid planting aggressive-rooted trees near paving, pipes, or foundations.
- Pest and disease resistance: Opt for varieties known for resilience, especially in your local area.
- Pruning needs: Some species demand regular shaping to look their best.
4. Balance Form and Function
The beauty of a tree lies not just in its foliage, but in its form and how it fits into your garden’s overall design. For structure and year-round appeal, mix evergreen and deciduous species. Use feature trees as focal points or anchor the garden’s layout with a row of sculptural specimens.
Create variety with layers—small flowering trees under taller shade trees, and perhaps an understorey of shrubs and perennials. This approach ensures interest through every season.
5. Plan for the Future
It’s easy to forget just how large trees can become. Be sure to give your new plantings enough space to mature. Think about how the garden will look in five, ten, or twenty years—not just the first season after planting. A well-planned landscape ages gracefully, with trees providing beauty, structure, and habitat long into the future.
6. Complement with Quality Garden Fencing
While trees provide privacy, shade, and structure, the right garden fencing is an essential partner in framing your green investment. Fencing not only defines boundaries but also protects young trees from wind and unwanted visitors. If you’re looking for reliable, attractive options to complement your landscape, check out garden fencing. Choosing fencing that blends with your planting scheme can unify the entire look, offering both style and function as your trees grow and thrive.
7. Choose Trees Suited to Your Location
Every garden is different, and what works for one yard might not be ideal for another. Here are a few suggestions based on popular goals:
- Small Gardens: Japanese maple, crabapple, dwarf citrus, or crepe myrtle.
- Large Gardens: Jacaranda, Queensland bottle tree, London plane, or eucalypts.
- Coastal Areas: Banksia, melaleuca, or coastal she-oak.
- Native Gardens: Grevillea, callistemon (bottlebrush), or wattle.
Visit local nurseries or speak with a landscape professional to discover trees that perform well in your region.
Selecting the right landscape trees is a rewarding investment in your property’s beauty and ecological health. With careful planning, you can enjoy a garden that offers shade, privacy, colour, and wildlife—all framed by quality fencing and thoughtful design.
If you’re unsure where to start, consult with a professional or visit local nurseries for expert guidance. Remember, the best gardens evolve over time—each tree you plant today is a gift to your future self and the generations who’ll enjoy it.
How to Design Your Backyard To Enjoy Affordable Outdoor Living
Seeding your lawn is one of the most impactful ways to revitalize bare patches, boost grass density, and breathe new life into your outdoor space. Whether you’re starting from scratch or overseeding an existing lawn to enhance its appearance, mastering the correct seeding process can make all the difference between a struggling yard and a lush green paradise.
The journey to a thriving lawn begins with timing. Choosing the right season is crucial to ensure successful germination and root development. For those growing cool-season grasses like fescue, ryegrass, or Kentucky bluegrass, early fall or early spring offers ideal conditions. These periods provide cooler temperatures and increased rainfall, which help young grass establish strong roots before extreme weather sets in. On the other hand, if you’re working with warm-season grasses such as Bermuda or zoysia, late spring into early summer is the best time to seed. During this window, warmer soil and consistent sunshine promote rapid growth and healthy turf formation.
Before laying down any seed, proper soil preparation is essential. If you’re overseeding an existing lawn, begin by mowing the current grass as short as possible without scalping it. Removing excess height helps the new seeds reach the soil more easily. Then, clear away any leaves, debris, or accumulated thatch, which can create a barrier between the seed and the soil. Loosening the top layer of earth with a rake, garden fork, or tiller will further improve the seed-to-soil contact that is vital for successful germination. If the soil in your yard is compacted or lacking in nutrients, consider mixing in a layer of compost or high-quality topsoil to improve both drainage and fertility.
Once the soil is prepared, selecting the right type of seed becomes the next focus. Choose a high-quality seed blend that is appropriate for your region’s climate and specific sun or shade conditions. Using the wrong seed can result in poor growth or a patchy lawn that struggles to survive. Distribute the seed evenly across the area, taking your time to ensure thorough coverage. For small patches, scattering by hand may be enough, but for larger areas, a broadcast spreader offers more consistent results. It’s important not to overseed, as crowding the seeds can lead to weak, spindly grass that competes for limited resources.
After sowing the seeds, lightly rake the surface to gently mix them into the topsoil. This step helps protect the seeds from being washed away by rain or eaten by birds while still allowing enough light to reach them. Avoid burying the seeds too deeply—just a thin layer of soil on top is sufficient for most grass types.
Proper watering is key to the success of your newly seeded lawn. For the first two to three weeks, maintain consistent moisture in the soil by watering lightly but frequently. The goal is to keep the top inch of soil damp without creating puddles or runoff. As the grass begins to germinate and establish roots, gradually reduce watering frequency but increase the depth of each session. This shift encourages the young roots to grow deeper into the soil, building a stronger and more drought-resistant lawn over time.
When it comes time to mow, patience is essential. Hold off on cutting the new grass until it reaches a height of at least three inches. When you do mow, make sure to use a sharp blade and remove no more than one-third of the grass height in a single pass. This gentle approach prevents stress on the young grass and promotes thicker, more even growth.
Proper seeding, when done with care and attention to detail, can completely transform your lawn. It’s one of the most affordable and effective ways to restore your yard’s appearance, improve turf density, and reduce the presence of weeds and bare spots. By understanding the timing, preparation, and maintenance involved, you set your lawn up for long-term health and beauty—turning your outdoor space into a lush, green haven for years to come.
Top 10 Lawn Grass Types for Australian Gardens
If you’re reading this, chances are you’re thinking about how to improve your lawn and considering the best grass types for your landscape.
Maybe you’ve been staring at your lawn, missing the lush, green carpet it used to be, and wondering how to bring it back to life. Or perhaps you’re starting from scratch with a new build or renovation, determined to get every detail right the first time.

Let’s be honest — most of us don’t give grass much thought. It’s just there, doing its job: covering the ground, keeping dust at bay, and giving the front yard a presentable look. Often, we inherit someone else’s lawn choices and may not even know what type of grass we have.
But if you’re planning to install a new lawn, your choice of grass will have a long-term impact on your landscape and lifestyle. It will influence how often you mow, how much time and money you’ll spend on maintenance, and whether your lawn can thrive in summer heat or survive winter dormancy.
A beautiful lawn can even increase your property’s value, while a patchy, brown one may diminish curb appeal. Whether you’re rebuilding, refreshing, or replacing a lawn that’s beyond repair, it’s worth doing the research before making a decision. The right choice could save you from years of unnecessary work and expense.
In Australia, there’s a wide variety of grass types available, but not all are well-suited to Perth’s sandy soil and unique climate. Many grasses come from the US or Asia and are developed for temperate or tropical zones. With Western Australia’s diverse climate regions, homeowners in Perth can often choose from both warm and cool-season grass varieties — but only if they match them properly to their site.
Before deciding on the best type of lawn for your home, think carefully about what you want from your lawn and how much effort you’re willing to put into it. Are you looking for a tough, low-maintenance lawn that can handle kids and pets? Or do you want something that feels luxurious and looks pristine to match a designer home? Is your budget limited, or are you ready to invest for the best possible result? Do you have the time to nurture a lawn from seed or runners, or do you need a quicker solution?
Creating the lawn you envision requires a solid plan and a realistic understanding of the process.
When establishing a new lawn, your first decision will be whether to grow it from seed or runners, or to lay turf. Each method has its pros and cons. Seeding is generally more affordable and gives you a broader range of grass options. It doesn’t require special tools or physical strength and allows you to blend different grass types for a more resilient lawn. However, it can be a slow and finicky process. Birds may eat the seed, rain can wash it away, and weeds can easily invade. It might take months before the lawn becomes usable, and establishing it requires frequent watering — not ideal if you have a demanding schedule.
On the other hand, laying turf is quicker and produces consistent, professional results. The lawn becomes usable within weeks and is typically made up of grass varieties suited to local conditions. But turf is more expensive, especially for large areas, and requires careful site preparation. Your grass options may also be slightly more limited.
If you’re unsure, speaking with a landscaping professional who specializes in lawns (like the Perth Landscaping team) can help you choose the right method and grass type for your property.
There are several important factors to consider when choosing a lawn grass:
Start by assessing your soil. For Perth’s sandy soils, choose grasses that prefer well-drained conditions. Consider your property’s microclimate, including exposure to salt air, frost, shade, urban heat, or poor drainage. Sunlight is crucial too — some grasses tolerate shade, while others wither without direct sunlight. If your area is too shaded, you may need to consider alternatives like paving, ground cover, or synthetic grass.
Next, think about your lifestyle. Be realistic about how much time and effort you can devote to lawn care. Lawns started from seed or runners need ongoing attention, especially during the early stages. Watering, weeding, and fertilising can take up considerable time and energy. And even after your lawn is established, some grass types need regular mowing — sometimes even with specialised mowers.
Water use and fertiliser needs vary significantly among grass types. If sustainability and cost are important to you, look for varieties that thrive on limited water and don’t require constant fertiliser. In Perth, scheme water is typically limited to twice-weekly watering with automatic systems. Bore users may get a third day, although this may soon change. Fortunately, new lawn installations can qualify for temporary watering exemptions through the Water Corporation.
Budget is always a key consideration. If you have the funds, instant turf offers quick results with minimal effort. Fast-growing grass types tend to be more affordable, while slow-growing premium varieties might cost more upfront but require less long-term maintenance. You might also need to factor in the cost of an irrigation system, which is essential if you’re busy or travel frequently. A landscaper can help you choose a suitable system for local conditions.
If appearance is your top priority, visit homes with established lawns and pay attention to the colour, texture, and feel. If children or pets will use the lawn frequently, a soft, durable variety is ideal. And if allergies are a concern, seek out grass types that produce minimal seed.
Finally, consider the size of your lawn area. Larger spaces multiply costs — from initial installation to long-term upkeep. With a big area, it becomes even more important to choose the right type of grass and method of installation to avoid unnecessary expense. There are smart strategies landscapers use to reduce costs and increase success rates — it’s worth asking for their insights.
In Western Australia, there’s no one-size-fits-all solution when it comes to lawn grass. Each type has strengths and weaknesses, and choosing one that matches your conditions is key to long-term success.
Below, we explore some of the most popular lawn grasses used in WA, including buffalo varieties like Palmetto and Sir Walter, Kikuyu, and a range of zoysia types. We’ll walk you through the characteristics, benefits, and drawbacks of each to help you make an informed choice for your garden and lifestyle.
Creating a Stunning Garden Path: Choosing the Right Materials
A thoughtfully crafted garden path does more than connect points in a landscape—it defines the journey through your outdoor space, giving shape and character to the environment. Whether you’re building a winding trail that meanders through flowers or a straight walkway leading to a cozy patio, the choice of materials is a crucial element in both appearance and performance.
One of the most classic choices is natural stone, favored for its organic look and resilience. Stones like flagstone, slate, and limestone can seamlessly blend into various garden themes. Flagstone’s broad, uneven shapes lend themselves beautifully to casual, flowing designs. Slate, with its cool hues and smooth texture, suits more structured, contemporary spaces. Limestone, soft in color and subtle in texture, brings a timeless charm to traditional or Mediterranean-style gardens.

For those looking for a more relaxed and budget-friendly solution, gravel is a practical pick. Its loose texture and natural colors work particularly well in cottage gardens or woodland settings. Fine options like pea gravel feel pleasant underfoot, while crushed stone forms a firmer surface that still allows water to drain through easily. Just be sure to include edging to prevent the material from straying into garden beds or lawns.
Concrete pavers provide a modern, versatile alternative. These can be molded to mimic the look of more expensive materials, and come in many shapes and shades. Their consistency makes them easy to lay out in precise patterns, making them ideal for clean, formal designs or geometric layouts.
For a touch of vintage elegance, brick pavers remain a favorite. Their warm, earthy tones and classic look evoke a sense of history and tradition. Authentic clay bricks age gracefully and offer excellent durability, while recycled bricks add personality with their weathered textures and backstory.
Cobblestones bring an undeniably old-world flair to a garden. Typically made from granite, these heavy, rounded stones have been used for centuries on roads and walkways. While they may take more effort to install and are less smooth underfoot, their strength and longevity are unmatched. Reclaimed cobblestones, sourced from historic sites, offer even more character for those looking to create a unique and sustainable feature.
Minimalist designs can benefit from stepping stones, which can be placed individually to weave through lawns or between plant beds. This approach maintains a strong connection to nature and works well in relaxed, organic landscapes. Whether crafted from stone, concrete, or even wood, stepping stones can transform a simple walk into a charming stroll through greenery.
In more contemporary gardens, porcelain pavers are becoming a go-to choice. Their sleek surfaces and resistance to wear make them a smart solution for high-traffic areas. Available in larger sizes and a range of neutral tones, porcelain pavers add a polished, modern look with very little upkeep.
Finally, slate tiles make a bold, stylish statement in any outdoor setting. Their rich, dark shades and natural anti-slip properties make them practical and elegant. Whether cut into clean rectangles or left in their irregular forms, slate adds a dramatic flair that complements lush, green backdrops.
When designing a garden path, think beyond aesthetics. Consider how the surface feels underfoot, how it interacts with rain and sun, and how much upkeep it will demand over time. The best garden paths aren’t just practical—they’re an invitation to slow down, explore, and enjoy the landscape you’ve created. With the right materials and thoughtful design, your garden path can become a lasting and beautiful feature of your home’s outdoor story.
Fixing Cracked Concrete Pavers: A Simple Guide to Restoring Your Outdoor Surfaces
Concrete pavers are known for their strength and visual appeal, making them a favorite for patios, driveways, and walkways. But even the most durable materials aren’t immune to the elements or the effects of time. Eventually, you might notice a crack or two, caused by shifting ground, heavy loads, or harsh weather conditions. Fortunately, repairing these cracks isn’t as complicated as it may seem—and with a bit of effort, your pavers can look as good as new.
Before jumping into repairs, it’s important to inspect the damage. Hairline cracks or surface splits are typically easy to fix, but deeper or wider fractures may be a sign that replacement is the better option. Take a close look to determine whether the paver can be salvaged or if it’s time for a new one.

If the crack is manageable, start by clearing the area of dirt and debris. A broom or vacuum can do the trick, and if the paver is particularly grimy, a quick rinse with water will help. Just be sure the surface is completely dry before continuing. Cleanliness plays a big role in how well the repair materials will stick.
To ensure a strong bond, it’s often helpful to slightly widen larger cracks using a hammer and chisel. This creates space for the repair filler to grip onto. For minor cracks, you can skip this step and move straight to filling.
Choosing the right repair filler is key. Look for one that’s designed specifically for concrete and can withstand outdoor conditions. Using a trowel or putty knife, press the filler into the crack, making sure it’s packed in firmly and slightly raised above the surface. This allows you to smooth it out evenly, so the repaired area blends with the rest of the paver.
Once the filler has been applied, use your tool to level it and wipe away any excess. Allow it to dry fully according to the product’s instructions. Patience here will pay off in the long-term durability of the repair.
After the filler sets, sealing the paver is a smart move. A good sealant will protect the surface from water infiltration, reducing the chances of future cracking. Apply the sealant evenly with a roller or brush, and give it ample time to dry before stepping or driving on the area.
In cases where the paver is too damaged to save, replacement might be the only option. Carefully remove the broken piece, clean the base, and install a new paver that matches the surrounding pattern. Make sure it’s level and stable before calling the job done.
Concrete pavers can last for decades with proper care. By tackling small cracks early and using the right materials and techniques, you can extend their lifespan and keep your outdoor spaces looking polished and well-maintained. A little effort today can prevent bigger repairs down the road—and keep your hardscape looking its best.
How to Protect Your Concrete Pavement From Winter Damage
Winter might bring cozy nights and picturesque snowfalls, but it also brings serious challenges for concrete pavements. The freeze-thaw cycle, snow buildup, and deicing chemicals can wreak havoc on even the most well-poured surfaces. But the good news? A little preparation goes a long way. Here’s how you can protect your concrete pavement and keep it in great shape through the coldest months of the year.

Start with a Good Seal
Think of sealant as a winter coat for your pavement. A quality concrete sealer keeps water out—one of the main culprits behind winter damage. When moisture seeps into concrete and freezes, it expands, leading to cracks and surface degradation. Applying a sealant in the fall, before freezing temperatures set in, adds a crucial layer of defense that can prevent future headaches.
Clear Snow Promptly (and Gently)
After a snowfall, it’s tempting to grab the nearest shovel and get to work. But when it comes to concrete, your tools matter. Opt for a plastic shovel or a broom to avoid scratching or chipping the surface. Removing snow and ice quickly helps prevent moisture from seeping in—and reduces the chances of slipping. For traction, skip the salt and try sand or kitty litter instead.
Use Deicers with Caution
Salt might seem like the easy fix for icy walkways, but it’s tough on concrete. Over time, traditional rock salt can cause scaling, pitting, and cracks. If you need a deicing agent, choose one labeled as safe for concrete—products containing calcium chloride or magnesium chloride are usually more gentle on your pavement.
Repair Cracks Before the Cold Hits
Existing cracks are like open doors for winter damage. Any moisture inside them can freeze, expand, and make those small cracks much worse. Before winter sets in, take a day to inspect your concrete. Fill in any cracks or small holes using a concrete patch or filler to prevent further deterioration during cold snaps.
Check Your Drainage
Water is one of concrete’s worst enemies in the winter, especially when it pools and freezes. Make sure water drains away from your pavement by checking for low spots or clogs in your drainage systems. Clean your gutters and downspouts regularly so water doesn’t end up pooling on or around your driveway or patio.
Avoid Overloading the Surface
Cold temperatures can make concrete more brittle. Heavy loads—like parked trucks or large equipment—can put extra stress on the surface and lead to cracking or sinking. If possible, avoid parking heavy vehicles on your concrete in winter, or use mats or plywood sheets to spread the load more evenly.
Invest in Heating Cables (for Extra Peace of Mind)
If you live in an area that faces long, snowy winters, installing heating cables beneath your concrete pavement might be worth considering. These systems keep the surface warm enough to prevent ice buildup, reducing your reliance on deicers and making snow removal easier.
Inspect Regularly
Throughout the winter, take a few moments to check your pavement. Look for early signs of damage like small cracks, stains, or spalling. Catching these issues early gives you the chance to act before they worsen—and saves you money on major repairs down the road.
Final Thoughts
Winter can be rough on your concrete, but a proactive approach can keep it looking great and functioning well for years to come. Sealing the surface, choosing safe deicers, and paying attention to drainage and damage are simple yet effective ways to weatherproof your pavement. With just a little effort, your concrete can easily withstand whatever winter throws at it.
Eco-Friendly Landscaping Ideas for a Greener Yard
In today’s world, where environmental concerns are more pressing than ever, creating a sustainable and eco-friendly yard is no longer just a trend—it’s a responsibility. By embracing sustainable landscaping, you not only contribute to the well-being of the planet but also create a beautiful, resilient outdoor space that thrives with less maintenance and fewer resources.

1. Reclaim and Reuse
One of the most impactful choices you can make when designing your landscape is to use reclaimed and recycled materials. Items like salvaged wood, recycled concrete, and vintage bricks help reduce landfill waste while adding rustic charm. These materials often carry character and history, bringing a unique look that new products can’t replicate. Always ensure that they’re free from toxic substances—especially if placed near edibles.
2. Use Permeable Paving
For areas with frequent rainfall or runoff, permeable paving is a smart alternative to traditional concrete. Options such as gravel, crushed stone, and permeable pavers allow water to filter through, reducing runoff and replenishing groundwater. They also enhance texture and contrast in your outdoor design.
3. Embrace Organic Mulch
Organic mulch—like wood chips, straw, or compost—not only retains soil moisture and suppresses weeds but also improves soil health as it decomposes. It’s a simple, renewable solution that benefits both your plants and the planet. Just keep it a few inches from plant bases to prevent rot.
4. Choose Native and Drought-Tolerant Plants
Plants that are native or drought-tolerant thrive with minimal water and maintenance. Species like lavender, succulents, and ornamental grasses suit Australia’s varied climates and support local biodiversity. Group plants with similar water needs together for even greater efficiency.
5. Harvest Rainwater
Installing rain barrels or cistern systems allows you to collect roof runoff, reducing reliance on municipal water. This rainwater is naturally soft and nutrient-rich—perfect for gardens. Use filters to keep out debris and ensure clean water.
6. Opt for Natural Fertilizers
Skip the chemicals. Instead, use compost made from kitchen scraps and yard waste to boost soil health. Organic options like bone meal and fish emulsion provide slow-release nutrients that nourish plants without harming ecosystems. Starting a backyard compost pile is a simple, effective step.
7. Light with the Sun
Solar-powered garden lights offer an energy-efficient, low-maintenance lighting solution. They charge by day and shine by night, adding ambiance to pathways, garden beds, and outdoor lounges—all without increasing your energy bill.
8. Build with Bamboo and Renewable Timber
For fencing, trellises, or pergolas, bamboo is a sustainable choice due to its rapid growth and strength. Certified teak and cedar also offer eco-conscious options for outdoor structures, blending durability with natural beauty.
9. Grow Up: Vertical Gardens
Vertical gardens are ideal for compact spaces. Whether it’s herbs on a balcony or flowers along a fence, they add greenery while improving air quality, encouraging pollinators, and insulating structures. Choose low-water or native plants for sustainable success.
10. Upgrade Your Irrigation
Drip irrigation systems use less water by targeting plant roots directly. Combined with smart controllers that adjust based on weather and soil data, they can significantly reduce water waste. Watering during early mornings or evenings also minimizes evaporation.
Creating an eco-friendly yard is all about thoughtful, sustainable choices. By using recycled materials, prioritising native plants, conserving water, and minimising energy use, you can build a lush, low-maintenance garden that supports local ecosystems and reflects your commitment to the environment.
Low-Maintenance Landscaping Ideas for Busy Homeowners
Not everyone has the time or energy to spend hours each week maintaining their garden. Between work, family, and the general hustle of life, most homeowners are looking for a yard that looks great without demanding constant attention. That’s where smart, low-maintenance landscaping comes in—and as a professional landscaper, I’ve helped countless clients create beautiful outdoor spaces that are easy to care for.
In this article, I’ll walk you through practical ideas to simplify your landscaping without sacrificing beauty or functionality. Whether you’ve got a small front yard, a sprawling backyard, or a tight city space, these tips are designed to help you spend less time weeding and watering, and more time enjoying your garden.

Start with a Simple, Functional Layout
The foundation of any low-maintenance yard is a simple layout. When designing, think in terms of clean lines, defined zones, and clear pathways. Avoid overcomplicating things with too many garden beds, curves, or features that will require trimming or edging later. Keeping things structured makes the space easier to mow, tidy, and maintain over time.
Choose Hardy Plants That Can Thrive on Their Own
One of the best ways to reduce garden work is by selecting tough, resilient plants that thrive in your local conditions. Focus on perennials instead of annuals so you’re not replanting every year. Drought-tolerant varieties are perfect for cutting back on watering, and evergreens are ideal for year-round structure with minimal care. Stick to a few types of plants and repeat them throughout your garden—this approach not only reduces maintenance but also creates a cohesive, calming look.
Minimise Lawn Space or Eliminate It Altogether
Lawns look great, but they’re often the most demanding part of the yard. Mowing, fertilising, watering—it all adds up. If you’re looking for a truly low-maintenance option, consider reducing your lawn space by expanding garden beds or installing gravel, paving, or groundcovers. For small areas, artificial turf has come a long way and can provide that lush green look without the upkeep.
Use Mulch to Keep Weeds Down and Moisture In
Mulch is one of my favourite tools for a low-maintenance garden. A thick layer of organic mulch not only gives garden beds a clean, finished appearance—it also helps suppress weeds and retain soil moisture. That means less watering and weeding on your end. It’s a simple addition with long-lasting impact, and it’s something I always recommend to clients who want easy care solutions.
Incorporate Hardscaping for Structure and Style
Hardscaping features like patios, stepping stones, retaining walls, and edging help break up the space while requiring virtually no maintenance. They also add instant structure to your garden and reduce the number of areas where plants need to grow. A paved courtyard or deck, for example, is great for entertaining and doesn’t need to be mowed or watered. Even a well-designed gravel pathway can add charm without adding chores.
Install Drip Irrigation for Effortless Watering
If watering is what’s keeping you from enjoying your yard, automated systems can be a game-changer. Drip irrigation for landscaping or soaker hoses deliver water directly to the base of your plants, reducing waste and helping them thrive with minimal intervention. Once installed, all it takes is a timer to make sure your garden stays hydrated—no hoses, no hand watering.
Group Plants by Watering Needs
A clever trick for reducing water use and simplifying maintenance is grouping plants by their watering needs. That way, you’re not trying to balance thirsty flowers with drought-tolerant shrubs in the same area. Keeping plants with similar care requirements together makes it easier to water efficiently and avoid over- or under-care.
Keep It Tidy with Clean Edges and Defined Borders
Low-maintenance doesn’t mean messy. In fact, one of the easiest ways to make your yard look sharp is by creating clean edges and clearly defining the boundaries of garden beds, paths, and lawns. Steel, stone, or plastic edging options work well and help prevent grass and weeds from creeping where they shouldn’t. These simple touches keep everything in place and reduce time spent trimming.
Consider Container Gardening for Control
If you have limited space or just want total control over your plants, container gardening is a fantastic option. Pots are easier to manage, can be moved around, and don’t require weeding or edging. Choose larger containers with good drainage, use high-quality soil, and go for hardy plants that don’t need daily care. You can create a stylish entryway, balcony garden, or courtyard setup with just a few well-chosen pots.
Stick to a Neutral Colour Palette for a Calm, Clean Look
When it comes to visual design, sticking to a limited colour palette helps create a sense of calm and cohesion. Too many bright, clashing flowers can make the garden feel chaotic—and often means more care is required to keep things looking balanced. Natural tones, soft greens, greys, and a few accent colours will make your space feel timeless and polished, without the need for frequent redesigns.
Final Thoughts
Low-maintenance landscaping doesn’t mean sacrificing beauty—it just means being smart with your choices. By planning thoughtfully, choosing resilient plants, and incorporating elements that require little upkeep, you can create a garden that fits your lifestyle, looks amazing, and gives you back your weekends.
As a landscaper, I believe the best yard is the one that works for you. If you’re feeling overwhelmed or unsure where to start, I’m always happy to help design something that meets your needs and fits your time constraints. Your outdoor space should be a sanctuary, not a second job—and with the right approach, it can be just that.

Front Yard Landscaping Ideas to Boost Your Curb Appeal
By Jack – Professional Landscaper, Australia When it comes to making a great first impression, your front yard plays a